Water is universal to life and, well, beer. While water makes up a large portion of plants, animals, and the Earth, it also makes up to 90 to 95% of your final home-brewed beer (depending on the style, of course). When water is your main ingredient, it becomes essential to know what's in it.
In this post we will first discuss some of the major minerals to watch out for in your water, how they may affect your beer, and the recommended levels to keep them at. We'll also take a look at some other essential parameters that you can monitor to ensure quality and consistency. Beer is more than a just a beverage. In today's culture, the craft beer scene is a way of life.
What's in your water?
Drinking water can be sourced from a variety of locations. If you live in a rural area, you may be using a private well. Wells source their water from surface water, which may include reservoirs, lakes, and rivers, as well as ground water, such as aquifers. If you live in a highly urban area, chances are your water is treated and monitored by a public municipality. Unlike wells, public water systems are heavily regulated by the United States Environmental Protection Agency (USEPA) under the Safe Drinking Water Act (SDWA). The water passing through these systems undergoes a number of treatment steps to ensure that it is clean and safe for consumption.
Water’s mineral content will vary in type and concentration depending on its source. If you are making your beer with the same water that you drink, it is important to recognize your water profile, as some minerals can have a great effect on the taste and look of your final brew. To understand your water profile, you can obtain a copy of your area's annual water analysis.
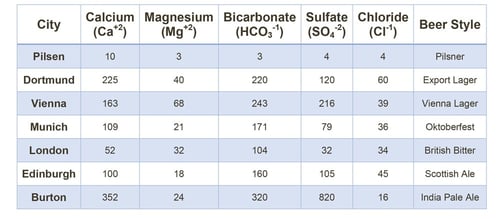
If you are interested in brewing a particular style of beer, an effective strategy is to recreate the historical water profile for its region of origin. By using deionized water, you can supplement salts and other additives to adjust your brewing water. The table below gives you a good idea of what some well-known historical water profiles look like.
 Table 1: Historical Water Profiles
Hardness
Defined as the sum of calcium and magnesium ions, total hardness is often expressed as calcium carbonate (CaCO3) equivalents . Other metals ions such as zinc or iron can also contribute to total hardness, but they are seldom included. Hardness can fall into one of two categories: The first is temporary hardness which is made up of calcium and/or magnesium hydrogen carbonates. Temporary hardness can be removed by boiling or lime softening in which the calcium ions combine with bicarbonate to precipitate out CaCO3. The second category is permanent hardness, which is the portion of calcium and magnesium sulfate salts remaining in the water after it has been boiled. Hardness is important because if the water is too “soft”, the mash will be too acidic, especially when using darker malts (which have higher acidity). If the water is too “hard”, the mash will not be as efficient. Brewers should aim to have a total hardness value of 150 to 500 ppm as CaCO3.
 Calcium is the principal ion that determines water hardness. While it doesn’t contribute to flavor, it is essential to successful yeast, enzyme, and protein reactions in both the mash and boil stages. In the wort, calcium ions react with phosphates derived from the malt, precipitating calcium phosphate and releasing hydrogen ions into the wort. This reduces the mash pH and improves enzymatic activity, reduces chances for bacterial infection, and promotes clarity and color. Calcium should be within the range of 50 to 150 ppm. If the value is too low, it is possible to add calcium. If the value is too high, it can impair the yeast’s ability to take up magnesium, reducing fermentation.
Another important ion that contributes to water hardness is magnesium. This ion is required by yeast to produce certain enzymes required for fermentation and should be closely monitored for several reasons. The first reason is that magnesium can interfere with calcium-based reactions as its phosphates are more soluble. Additionally, high levels of magnesium can produce a sour taste in beer and in some cases can have a laxative effect on the beer drinker. Magnesium levels should be relatively low, within 0 to 40 ppm.
Alkalinity
An essential parameter to measure in brewing water is total alkalinity. This is a measurement of the carbonate (CO3-2), bicarbonate (HCO3-), and hydroxyl (OH-) ions present in the water. Alkalinity influences the mash’s ability to resist pH changes throughout the brewing process. While the recommended level of alkalinity varies a bit based on style, it is recommended to keep alkalinity at a value less than 100 ppm. Lighter beers will typically have a lower alkalinity, while darker beers will have a higher alkalinity.
Sulfate
Some ions play a bigger role in the flavor and smells of beer, such as sulfate. Often used to highlight hop bitterness, sulfates produce a crisp, drier beer flavor. Sulfate is weakly alkaline and does not contribute much to the overall alkalinity. It should be noted however, that while easy to add, sulfates are difficult to remove. In general, brewers can aim for less than 150 ppm for mild beers and upwards of 150 to 350 ppm for highly bitter beers. When used in conjunction with chloride, sulfate can make all the difference between a stout and an ale. For this reason, the ratio between sulfate and chloride makes a bigger impact than its measured amount.
Chloride
As a contrast to sulfate, chloride helps accentuate sweetness and imparts the feeling of a full body beer with better head retention and enhanced mouthfeel. Typical brewing ranges of chloride fall between 0 and 100 ppm. When chloride is present in excess of 250 ppm, the beer will have a salty taste; more than 300 ppm can affect yeast health and metabolism. It should be noted that chloride is not related to residual chlorine from disinfection techniques.
Chlorine
Chlorine is an effective disinfectant that works by oxidizing the cellular membranes of microorganisms. As a result, chlorine is added to municipal water sources as a way to remove any organisms that could adversely affect your health. While chlorine is beneficial for drinking water, it is not ideal for brewing as it can cause off flavors and byproducts in the final brew.  Additionally, chlorine’s presence can cause oxidation of the membranes used in reverse osmosis systems, ultimately making filtration much less effective. A brewer should test the chlorine levels of their source water, aiming for a goal of zero ppm. A carbon filter can be installed to help remove any residual chlorine.
Chlorine can be measured as free or total chlorine. Free chlorine refers only to unbound chlorine, or that which is available to disinfect. Total chlorine is the measurement of both bound and unbound forms. If using a municipal water source, then a ‘total chlorine’ test is best to understand all forms of chlorine present.

What else is important?
Minerals are not the only thing you need to take into consideration when home brewing beer. If you are looking to create a colorful, well-balanced beer, there are several other important parameters that can make a big difference in your final product.
Temperature
At its core, all beer is made from the same four ingredients: water, yeast, hops, and grain. Some brewers will choose to modify this basic recipe to include spices or fruits, as seen in many Belgian beers. Regardless of additives, all beers can be classified as either an ale or a lager based on which yeast is used. Temperature plays an important role in yeast fermentation and can be a deciding factor as to which style is chosen.
 To begin, milled grains, such as barley and oats, are added to a large vessel called the mash tun. Hot water is added to activate malt enzymes from the grains, which are then able to convert the starches into fermentable sugars. The next step, called lautering, separates the sugary liquid known as wort from the spent grains. In order to end enzymatic activity, the temperature is brought to over 200° Fahrenheit, a process known as “mashing out”. The wort and some water is sent through the mash, removing any final sugars. Brewers can use temperature and time to manipulate which enzymes are active to bring out the desired sugars and influence taste. In general, lower mash temperatures increase fermentability while higher temperatures decrease it.
The wort then goes through a series of boils while hops and other additives are added. Once cooled down, the yeast is pitched and thus begins the process of fermentation. Over the course of the next 7 to 10 days, the yeast will convert the simple sugars in the hopped wort into alcohol and carbon dioxide.
During fermentation, sugar from the grains is converted to ethanol and carbon dioxide via yeast. Ale yeast ferments best at higher temperatures, typically 65 to 70°F (18 to 21°C). At these warmer temperatures, fermentation speeds up, taking less time and also producing esters and phenols that add to the flavor. Lager yeasts ferment best at lower temperatures around 50 to 55°F (10 to 13°C). These yeasts tend to ferment slower, producing fewer phenols and creating a flavor more influenced by the hops and grains.

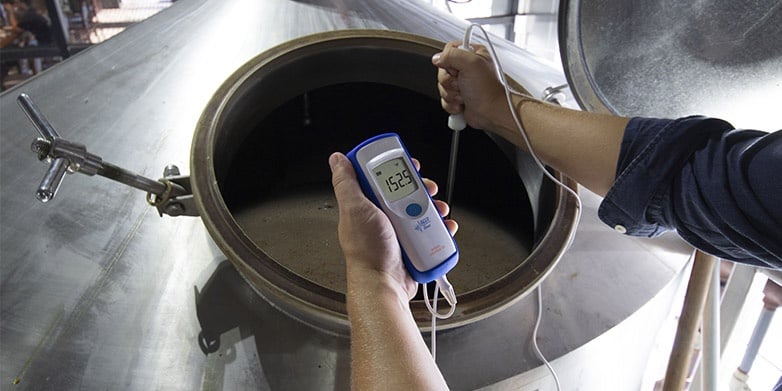
Brewing Thermometer (HI935012)
pH
To maintain a consistent flavor profile and ensure a stable product, pH should be monitored throughout the beer making process. pH affects enzymatic activity, yeast fermentation, and the incorporation of flavoring components.
During mash, pH plays a vital role in the efficiency of starch breakdown. While each enzyme group operates at different temperatures and pH ranges, the breakdown of starch into fermentable sugars is generally optimal between pH 5.2 and 5.6.
Hop utilization is also dependent on pH. As the pH becomes more acidic, the solubility of the hop resin increases, releasing compounds that result in a more bitter tasting product. Brewers can add compounds such as phosphoric acid, lactic acid, and salts, such as gypsum, to adjust the pH as needed.
During fermentation, the pH should be lower to accommodate the yeast, safeguard microbial stability, and ensure consistent flavoring of the beer. For the best results, an optimal pH range during fermentation is between pH 4.1 and 4.3. A fresh, finished beer has a pH of about 4, with the pH naturally dropping as a result of oxidation.
Conductivity (EC)/ Total Dissolved Solids (TDS)
Total dissolved solids, or TDS, is a measurement of the total concentration of dissolved substances in water. This can include minerals, salts, other organics, and even some chemical residues. Ground and surface waters contain high minerals and organic materials at times, and they are also subject to pollution by human activity. On the other hand, municipal plants are often regulated by law to disinfect or pre-treat water with chemicals, removing contaminants that would adversely affect taste or health.

These additives that serve to make drinking water safe can be an issue for brewers, as disinfectants can result in off flavors in the brew. The upside is that TDS can provide you with an indication of the gross mineralization of your water. The downside is that TDS is not ion specific.
Monitoring your TDS is a good way to be alerted to any unusual changes in your water supply. A high TDS value can indicate water that is more corrosive to equipment and prone to scaling. Water to be used for brewing should have less than 500 ppm TDS.
Some brewers may wish to use selective water treatment options, such as reverse osmosis systems, to remove minerals from incoming water to redesign the water profile. The ability to define the water profile allows for a greater level of control and a diverse array of beer styles.
Turbidity
The first impression of a beer is visual. Not only do beer drinkers note the color of the brew, but also its clarity, or sometimes referred to as turbidity or haze. Beer turbidity is a parameter constantly monitored in many breweries. Several substances can cause this haziness in beer, but the most common issue is due to a cross-linking of micro nutrients known as polyphenols and proteins. These elements are always present in beer, and they are the main contributors to haze when they combine to form insoluble particles.
Characterized by visible sediment, haze is sometimes used to characterize a beer; you commonly see this with unfiltered wheat beers. In most other types of beer though, haze is undesired.  Chill haze is seen when oxidized compounds in the beer begin to polymerize, producing a precipitate at cooler temperatures. Upon warming, the precipitate dissolves and the haze disappears. Permanent haze occurs when these oxidized compounds form clusters that are insoluble even at warmer temperatures. Haze can also be an indicator of microbial spoilage, including Acetobacter aceti and Lactic acid bacteria that may produce off flavors in the finished product.
Brewers can decide how they want to condition their product; some will choose to filter their product, improving clarity by removing yeasts, proteins, and other debris, while others will use additives to help those haze-inducing compounds dropout. A range of treatments are available for avoiding haze problems. Most important times to monitor the turbidity is after filtration and before the beer enters the bright tanks for carbonation. Brewers should aim for 0 to 0.5 FTU (Formazin Turbidity Units).
Dissolved Oxygen
Understanding and managing oxygen uptake during beer production is important for creating a stable product. In wort, a small amount of dissolved oxygen can ensure proper yeast fermentation, ultimately affecting the color, taste, and other important characteristics of the beer. Typically, for a traditional ale or lager wort, 5 to 10 ppm of dissolved oxygen will provide a suitable environment for yeast. However, oxygen needs can vary based on yeast strains and specific gravity levels.
Spot checking can be helpful to minimize exposure to air by ensuring the connections to pumps, transfer lines, and tanks are secure during beer movement and fining. Measuring dissolved oxygen before and after these transfer points may provide insight to faulty equipment or connections and help improve transfer practices.
For many beers, the final step is aging and secondary fermentation. During this process, the beer matures, developing natural carbonation and promoting unique flavors. Additional carbonation can be added through the infusion of carbon dioxide. Once carbonated, the beer is ready for packaging and is put into bottles or kegged for distribution. Too much oxygen in the finished product can result in off flavors or colors, which can give the beer a “skunky” aroma and a decreased shelf life.
While dissolved oxygen values can vary widely between breweries, a general rule of thumb is to obtain values less than 0.05 ppm throughout the post-fermentation process

Conclusion
The next time you head off to start your home brew beer, just remember that your beer is only going to be as good as the ingredients you put into it. To create a quality beer, it is important to have an understanding of the smaller details, from ingredients to the final product. A strong technical knowledge and the right tools will allow you meet expectations on taste and color, take corrective action early on, and ultimately focus on your passion for craft beer.
Sources
[Table 1]Palmer, John J. How to Brew: Everything You Need to Know to Brew Great Beer Every Time. Brewers Publications, a Division of the Brewers Association, 2017.

