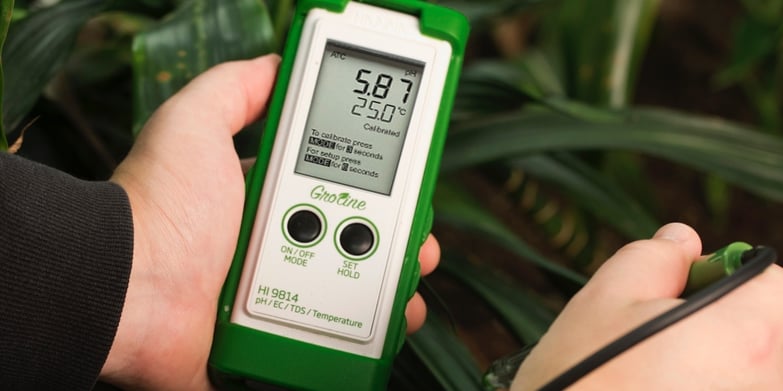
Designed especially for hydroponic, aquaponic, and greenhouse growers who need to test pH, EC, TDS and temperature, the Hanna Instruments GroLine HI9814 is a combo meter that measures all four of these parameters.
The GroLine HI9814 is waterproof, easy to use, and features Hanna’s exclusive QuickCal mode. While other meters on the market use two separate probes for pH and EC/TDS, are bulky, and have lower accuracy, the Hanna HI9814 delivers accurate results with one singular probe, is ergonomic, and stabilizes and calibrates in about 30 seconds. With its affordable price and practical design, users of any level can professionally monitor pH, EC/TDS and temperature for just $199.

Check out the GroLine HI9814 in action now with this handy user guide, and see just how easy we've made it to use.
Menu
- About the GroLine pH/EC/TDS HI9814 Meter
- Getting Started
- Setting Up the HI9814 GroLine Meter
- Calibration
- Testing
- Storage
- Maintenance
- Preparing a Soil Sample
- The Direct Soil Conical Tip pH Electrode HI1294D
About the GroLine pH/EC/TDS HI9814 Meter
The HI9814 GroLine waterproof meter lets you measure pH, electrical conductivity (EC), temperature, and total dissolved solids (TDS) in parts per million (ppm). It's the ideal nutrient meter for a range of purposes in agriculture, horticulture, aquaponics, and hydroponics.
The GroLine HI9814 is the most accurate pH/EC/TDS meter in its class and is one of Hanna Instruments' best selling products.
Video: Overview of GroLine HI9814 Nutrient Meter (90 seconds)
The HI9814 also features a Quick Cal function to make calibration fast and simple. Quick Cal can calibrate both pH and EC — a trait that no other meter in the agriculture market has.
Video: How to use HI9814 GroLine Nutrient Meter (5 minutes)
Getting Started
Step 1: Rinse the electrode with deionized water to remove any salt deposits that may have formed around the protective cap.
Step 2: Install the batteries into the proper compartment. Be sure to tighten the battery cover completely to ensure water-tightness.
Step 3: Connect the probe by placing it into the socket, aligning the pins. Tighten the nut to ensure a secure fit.
Step 4: Press the ON button to turn on the meter.
Setting Up the HI9814 GroLine Meter
On power up, the meter will display the last selected parameter, temperature, stability indicator, and instructions on how to enter calibration/setup modes.Selecting the correct EC or TDS unit
Step 1: To enter Setup Mode, press and hold the MODE button for six seconds. OFF and CAL messages will appear before entering Setup Mode.
Step 2: Press the SET button to choose EC UNIT (for conductivity), 500 UNIT (for 0.5 TDS factor), or 700 UNIT (for 0.7 TDS factor).
Hanna Tip: We are often asked when to use 0.5 or 0.7 PPM. You need to match the PPM values based on the values given by your fertilizer manufacturer’s nutrient feed charts. These feed charts don't always specify which scale their PPM values are based on; in these cases, contact the company directly.
Selecting calibration type
Step 1: After you select your EC/TDS setting, press MODE to go to the CAL setting.
Step 2: Press the SET button to choose either CAL STD for standard calibration, or CAL QUIK for the one-point quick calibration.
Hanna Tip: Use Quick Cal whenever possible. When calibrating using the fast, one-point Quick Calibration feature compared with the two-point Standard Calibration option you will save time and money on calibration solutions. The QuickCal feature works with the HI500036P Calibration Solution Sachets or the HI5036-023 250ml bottle.
Selecting temperature units
Step 1: After you select your calibration setting, press MODE to go to the TEMP setting.
Step 2: Press SET to select either °F or °C.
Selecting auto-off time
Step 1: After you select your temperature setting, press MODE to go to the AOFF setting.
Step 2: Press SET to select an AOFF interval at either 8 minutes, 60 minutes, or to disable (---).
Hanna Tip: The meter can be used as a wall mounted monitor when the AOFF feature is extended to 60 minutes or is disabled. If battery life is a concern, eight minute auto off is the best option.
Finishing setup
After you select your auto-off setting, press MODE to return to the measurement screen.

Calibration
Now that the meter is set you your liking, let's calibrate the probe. Calibration of the Hanna HI9814 GroLine Meter is made simple with our Quick Calibration Solution HI50036P.
Quick Calibration Steps
Step 1: Clean your electrode by removing the protective cap and rinsing the probe in distilled or deionized (DI) water. This removes any impurities or salts that may contaminate the calibration solution.
Step 2: Press and hold the MODE button for three seconds until CAL is displayed to enter calibration mode.
Step 3: Immerse the probe in an open packet of quick calibration solution, stirring gently.
Step 4: Wait for stabilization. Once stable, the meter will automatically calibrate. The display will read CAL OK, then return itself to normal measurement mode.
You are now free to take your measurements!
Hanna Tip: If you happen to be out of the Quick Cal solution then use the Standard Calibration mode with the standard pH 4.01 and pH 7.01 buffers and 1413 µS solution. Make sure that you watch the screen carefully so you don't miss the prompt to change the buffer or solution! Missing a prompt will result in an error and a failed calibration.
Testing
Get your sample ready before performing the following steps. (Scroll down for instructions and a video on the best way to prepare a soil sample.)
Step 1: Before taking a measurement, rinse the probe in distilled or DI water.
Step 2: Place the probe in your sample, and wait for a stable reading. Pressing the SET button will let you switch between pH and EC/TDS readings.
Hanna Tip: Make sure that you stir the sample. Stirring ensures the sample is well mixed and increases stability speed; a light stirring is all it takes. After stirring, ensure that you wait until the reading stabilizes. (We often see people taking the reading too early. It's better to take extra time to make sure that the reading is stable.) Finally, clean the electrode at least weekly or as needed with the Hanna Cleaning Solution for Agriculture Applications HI700661P.

Storage
Step 1: Once finished with measurements, press the OFF button to power down the meter. Rinse your probe with distilled or DI water to prevent any biological growth on the glass of the electrode.
Step 2: Add a small amount of storage solution to the protective cap, and place the cap over the probe. This ensures that your probe stays hydrated until your next use.
Hanna Tip: Make sure that you store the electrode out of direct light to minimize algae growth. Your pH meter should also be stored in a cool place; letting the meter sit out under the heat of high-powered grow lights will cause premature wear and tear.
Maintenance
It's important to periodically clean your probe. Setting a maintenance schedule can help you keep on top of it.
Step 1: Place the probe in a packet of General Purpose Cleaning Solution for Agriculture HI700661P for 15 minutes.
Step 2: Rinse the probe with distilled or DI water.
Step 3: Place the probe in storage solution for at least 2-3 hours.
After cleaning your probe, you will need to recalibrate it before taking any measurements.
Get your Hanna GroLine HI9814 now on our website or through one of our many retail partners nationwide! Upgrade to the entire kit (HI9814K) for just $75 more and in addition to the meter you will receive 25 QuickCal solution sachets, 25 general purpose cleaning solution sachets, a 500mL bottle of storage solution, and the green shock proof rubber boot.
Preparing a Soil Sample
Not sure how to prepare a sample for pH and EC/TDS testing? Follow these steps, or watch the video below!
Step 1: Gather your materials. You will need:
- A container cleaned with distilled or DI water
- A measuring cup
- A fresh sample of your soil
- Distilled or DI water
- A magnetic stirrer OR a stirring utensil
Step 2: Measure out equal parts of soil and distilled water, ensuring there is a large enough sample to completely submerge your electrode junction.
Step 3: Add the soil to the clean container, then add the distilled water.
Step 4: Stir the sample. For best results use a magnetic stirrer. If you don't have one on hand, use a clean stirring tool. Make sure all clumps of soil get broken up!
Step 5: Wait 15 minutes for the sample to settle before taking your measurement.
Step 6: Immerse your electrode into the sample and wait for a stable reading.
Hanna Tip: An ideal pH reading is between 5.5 and 7. If you are getting a reading far off from this, there may be a problem with your electrode. Check our pH Eelctrode Troubleshooting Guide for some common problems and how to fix them.
Video: Preparing a Soil Slurry (2 minutes)
P.S. We're Making it Even Easier!
The Hanna Conical Tip pH Electrode HI1294D allows you to test your soil or soil medium quickly and directly.
